FreshnCrunchy

Delicious, Fun & Healthy Food

Cheesecake

Cranberry Chocolate Cheesecake & "Plant-based Desserts" - An Online Course at the Matthew Kenney Culinary

Cheesecake, Raw CheesecakeLina Liwag1 Comment
 My final project - "Create Your Own Dessert"


My final project - "Create Your Own Dessert"

Above are other photos from my  course.

The course is for six days and you have two weeks to finish it.   It starts with simple recipes and techniques and then we l progressed to the more complicated ones a few days later.  What's good about it is that you can do it in your own time and in your own kitchen.  I work full time so I would prep after dinner and then put them together the next day.  Most times, I did cooking marathon in the weekends since I work better that way.  Overall, I found the colours, textures, ingredients, techniques, especially the plating very helpful and inspiring for me.  One day, I would love to have a small Cafe  where I can offer plant based desserts.  

On this course, you learn making plant based ice cream and sorbets, chocolate cakes and sauces, pana cotta and other components of desserts like crumbles, brittles, compotes, coulis and most of all, better versions of popular sweets. 

IMG_6902.JPG

As mentioned in my previous post, I recently took an online course called "Plant-based Desserts" from the Matthew Kenney Culinary.  It's no longer Christmas, a time popular for sweets but  January was a birthday month for so many friends and family members including my husband and I.  I thought it would be just the perfect time to learn and make these desserts. My dad celebrated his 90th in the Philippines on January 15th and that's such a big BLESSING, I must say! 

Dessert-making was never a skill that I was good at since I never had any  experiences when I was younger...didn't do any baking then as I preferred making savoury dishes.  This has to be learned and practiced - hence this course.  My family enjoyed much of it and some samples also went to friends and co-workers.

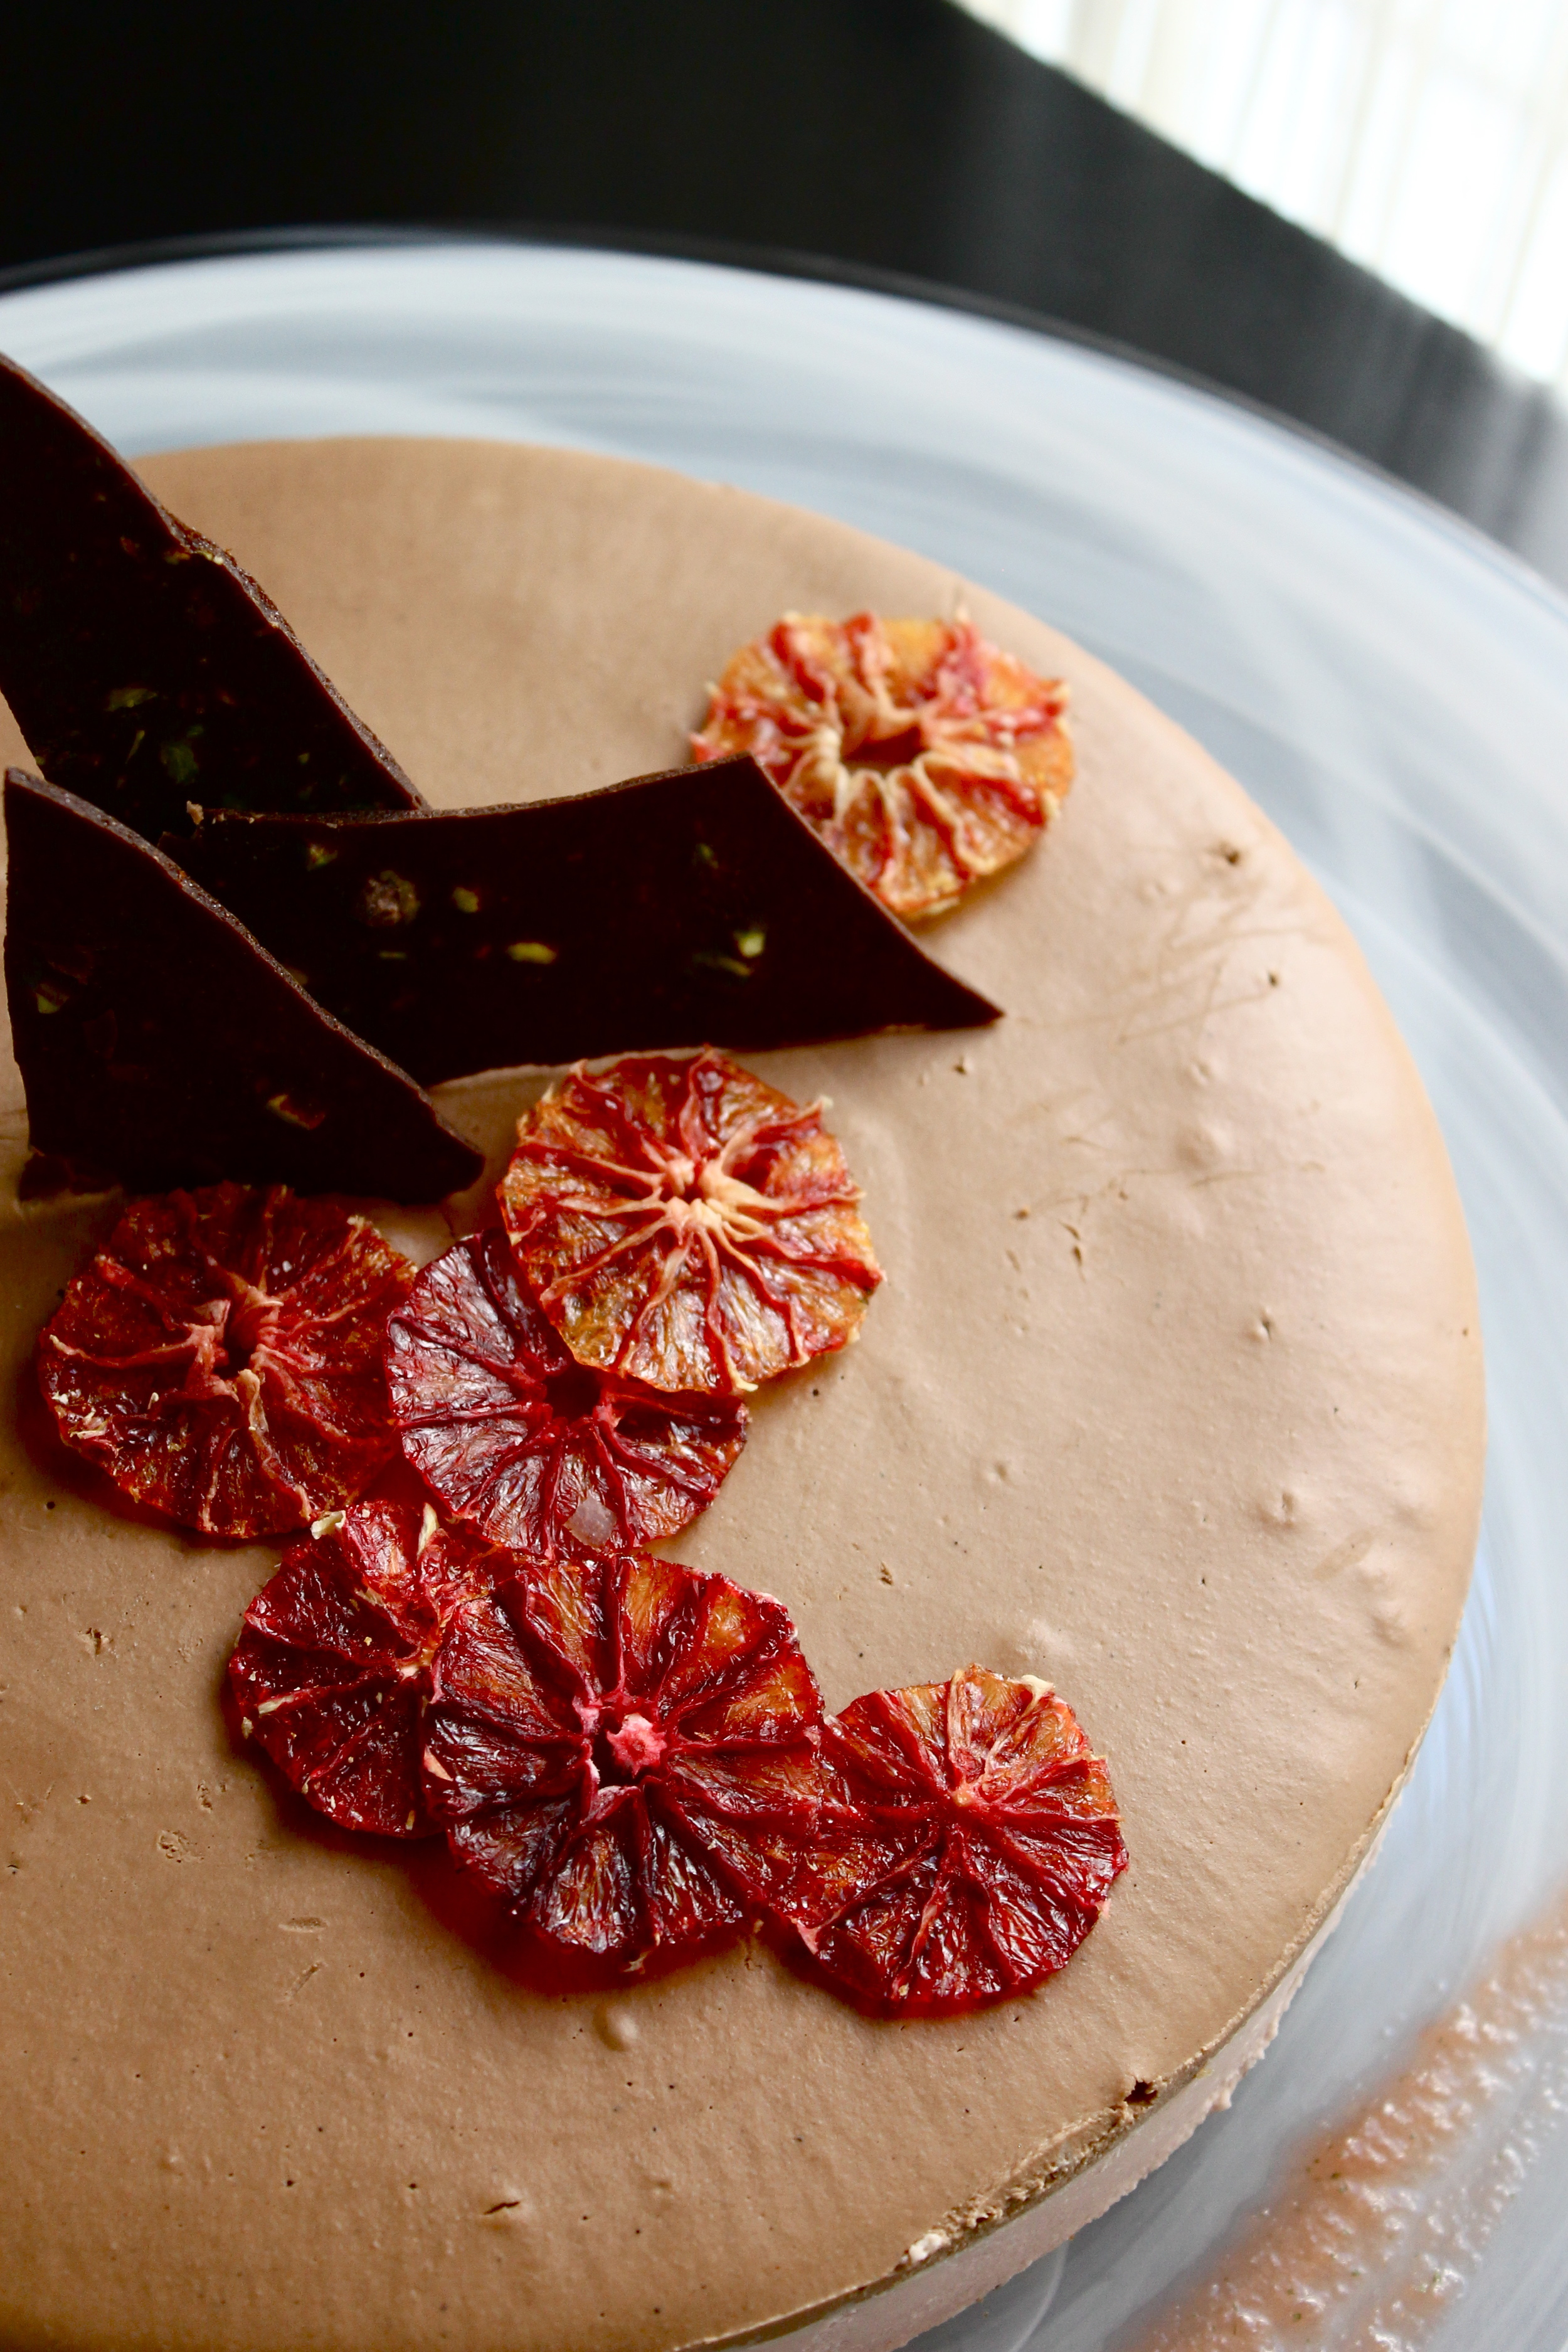
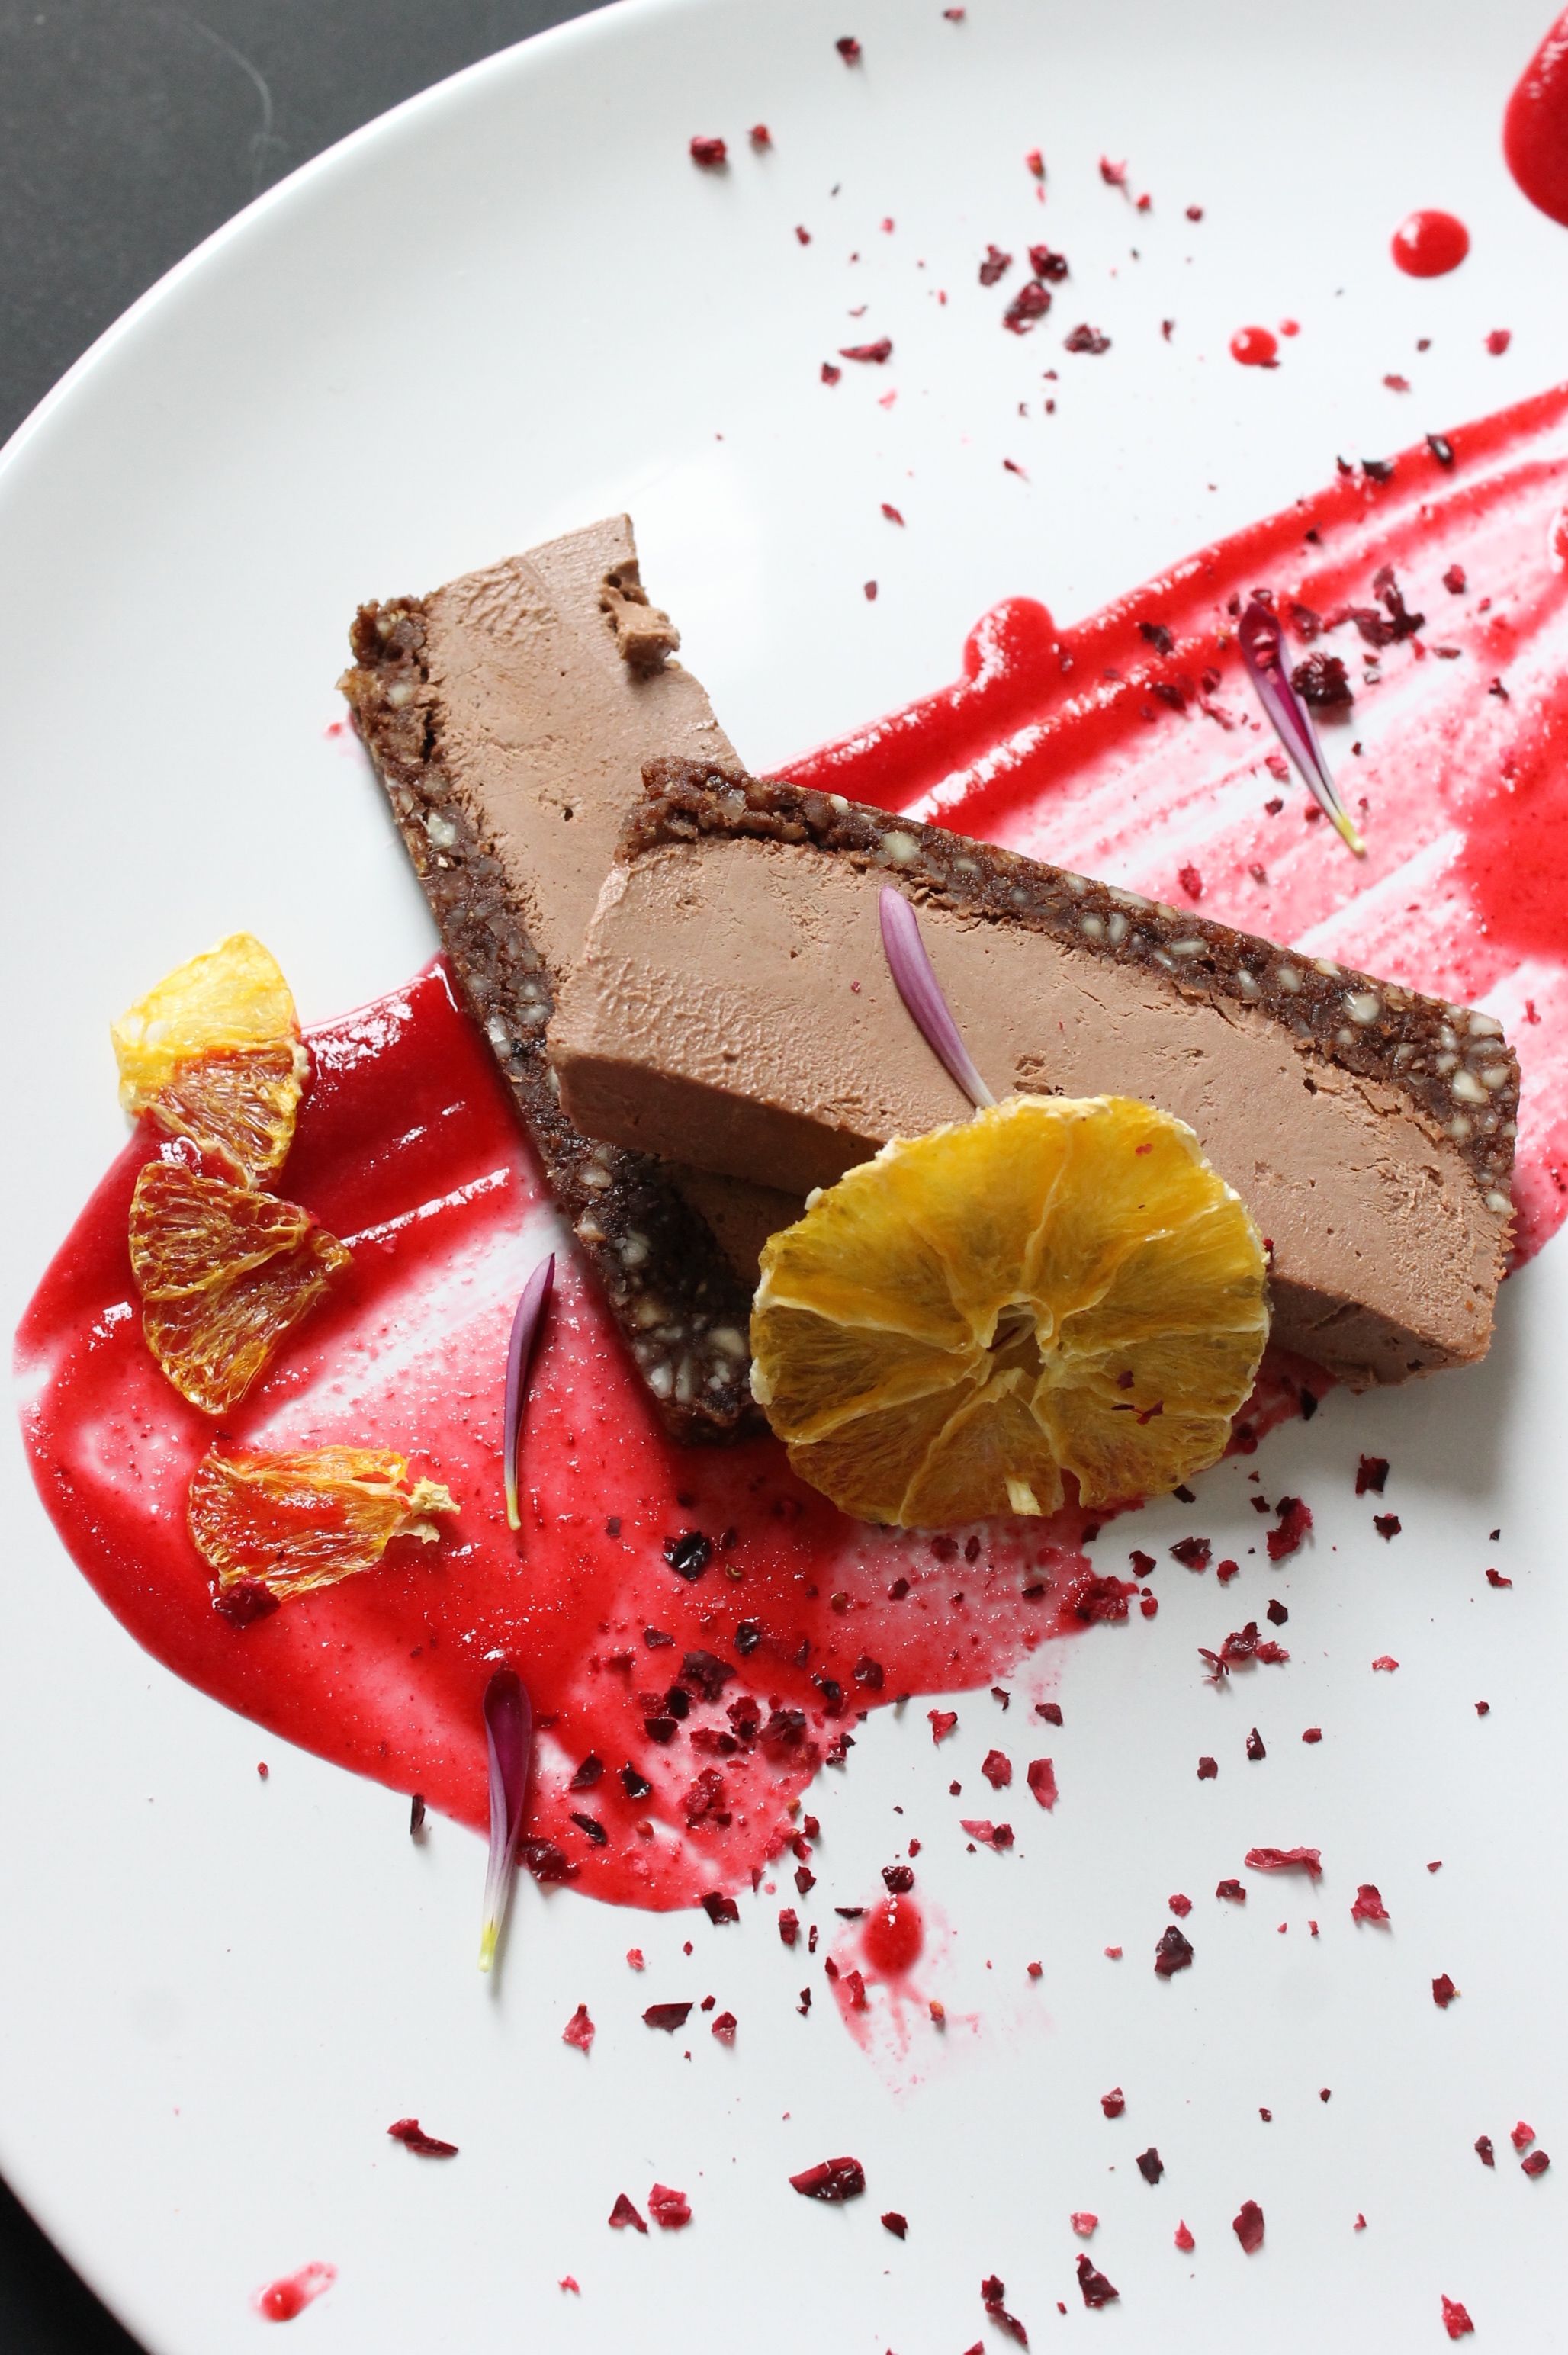
 This dessert was what I submitted for my finals on this course.  It was shared many times to my friends and co-workers for recent birthdays and celebrations.  It was also part of what I served for dessert at a private dinner for Valentine's Day.

Cranberry Chocolate Cheesecake

Crust:
1  cup almonds
6 dates, soaked for 10 mins.or until soft (save the liquid) 
3 Tbsp. cacao powder
Pinch of Himalayan salt

In a food processor, pulse the first two ingredients until coarsely chopped.  Add the cacao powder.  If the mixture is dry, add a bit of the soaking water from the dates. Pulse until mixture gets sticky.  Transfer into a 7" springform (if you want it thicker) or into an 8" round or square springform pan (for easy cutting later) and let it set in the fridge.

Filling:
1 1/4 cup cashews, soaked 4-6 hours
1/2 cup fresh cranberry juice (or blood orange juice)
1/3 cup cacao powder
1/3 cup. cacao butter, melted
1/3 cup coconut nectar or maple syrup
1/2 tsp. vanilla essence or powder
Pinch of Himalayan salt

In a high speed blender, place all ingredients except the cacao butter and blend until smooth.  On low speed. slowly add the cacao butter until fully incorporated.  Pour into crust and freeze until set, approximately six hours. Pop it out from the pan while still frozen and let it sit for 10 minutes.  Since this is a rich dessert, cut them into 1" thick and 4" long and serve.

Cranberry Sauce (Optional)
1/4 cup fresh cranberrries or frozen and thawed
1/4 cup raspberries
1/2 cup blood orange or regular orange juice
2 Tbsp. maple syrup
pinch of cardamom

Blend until smooth.  Strain through chinois or wire sieve.

Toppings:
Cacao nibs
Powdered dried berries or dried cranberries


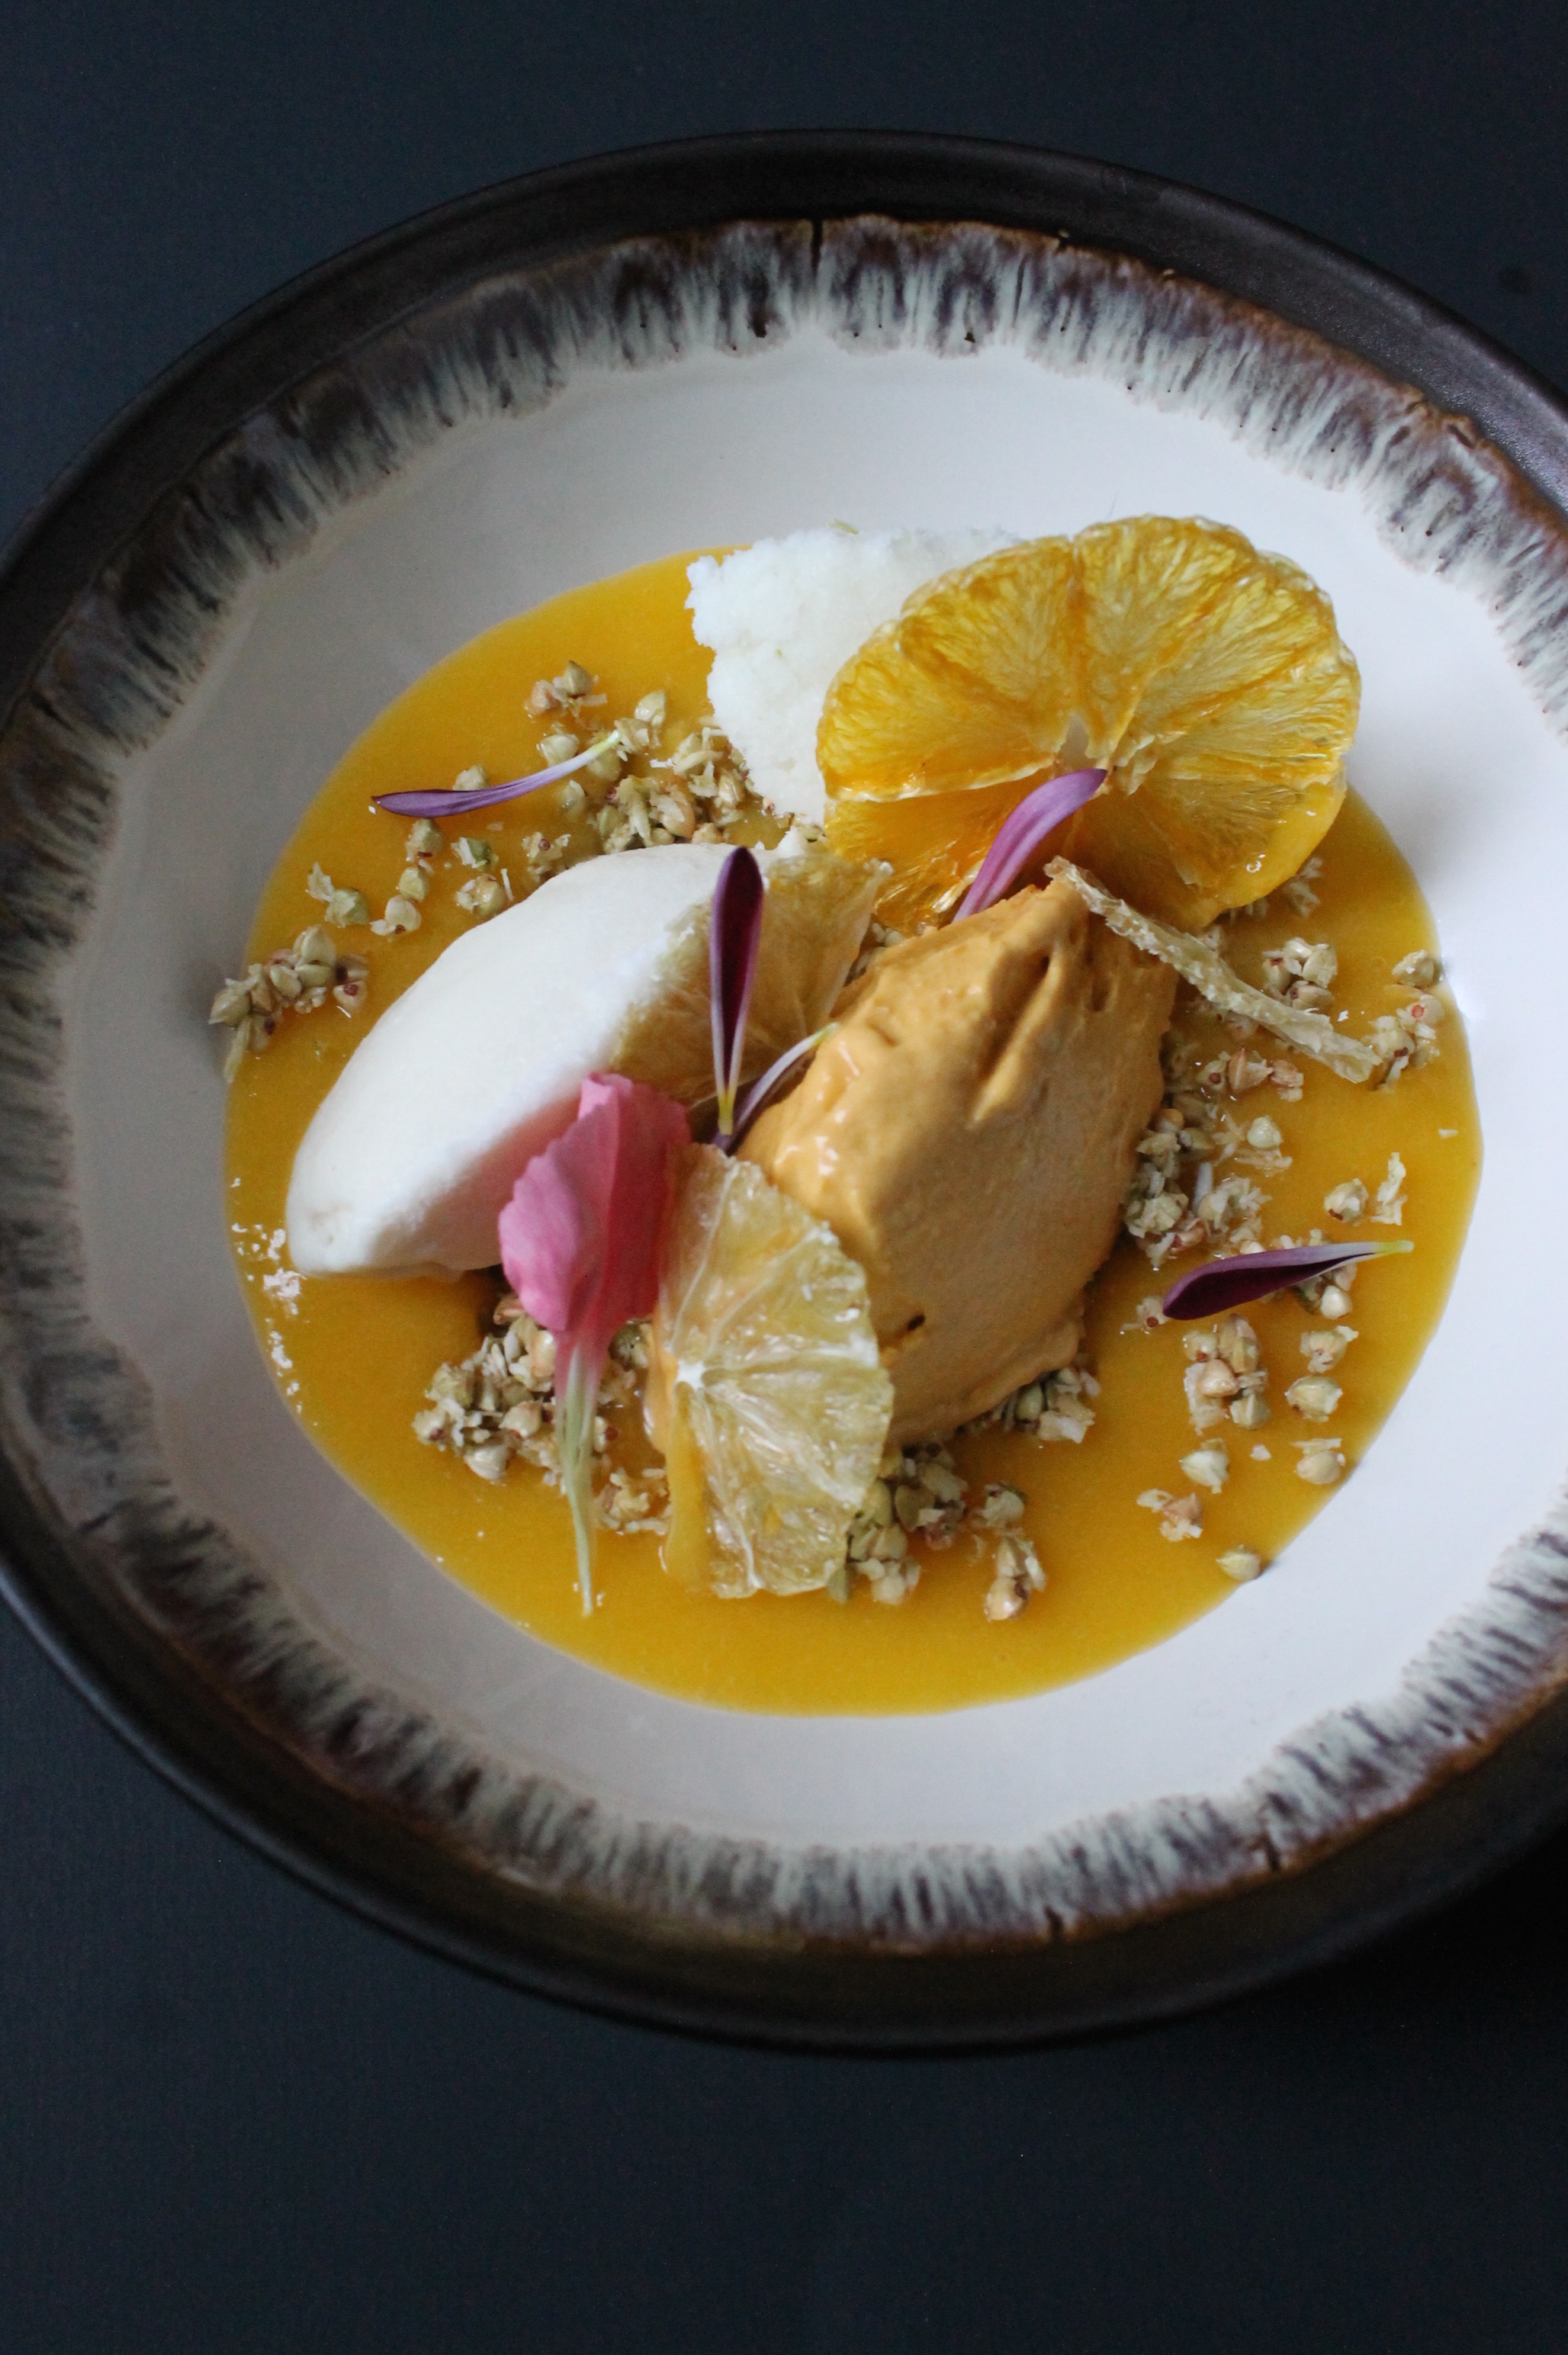
On Valentine's Day, I served diner for 3 couples.  I played as their chef and made them a 5-course meal for their date night.  It was fun and they enjoyed a full plant based menu.  It was dark  and the quality of the photos weren't as great but I'm sharing them below:

Dessert was a combo of the chocolate cheesecake and coconut, cranberry and blood orange ice cream square (this is a nut free component)

Dessert was a combo of the chocolate cheesecake and coconut, cranberry and blood orange ice cream square (this is a nut free component)

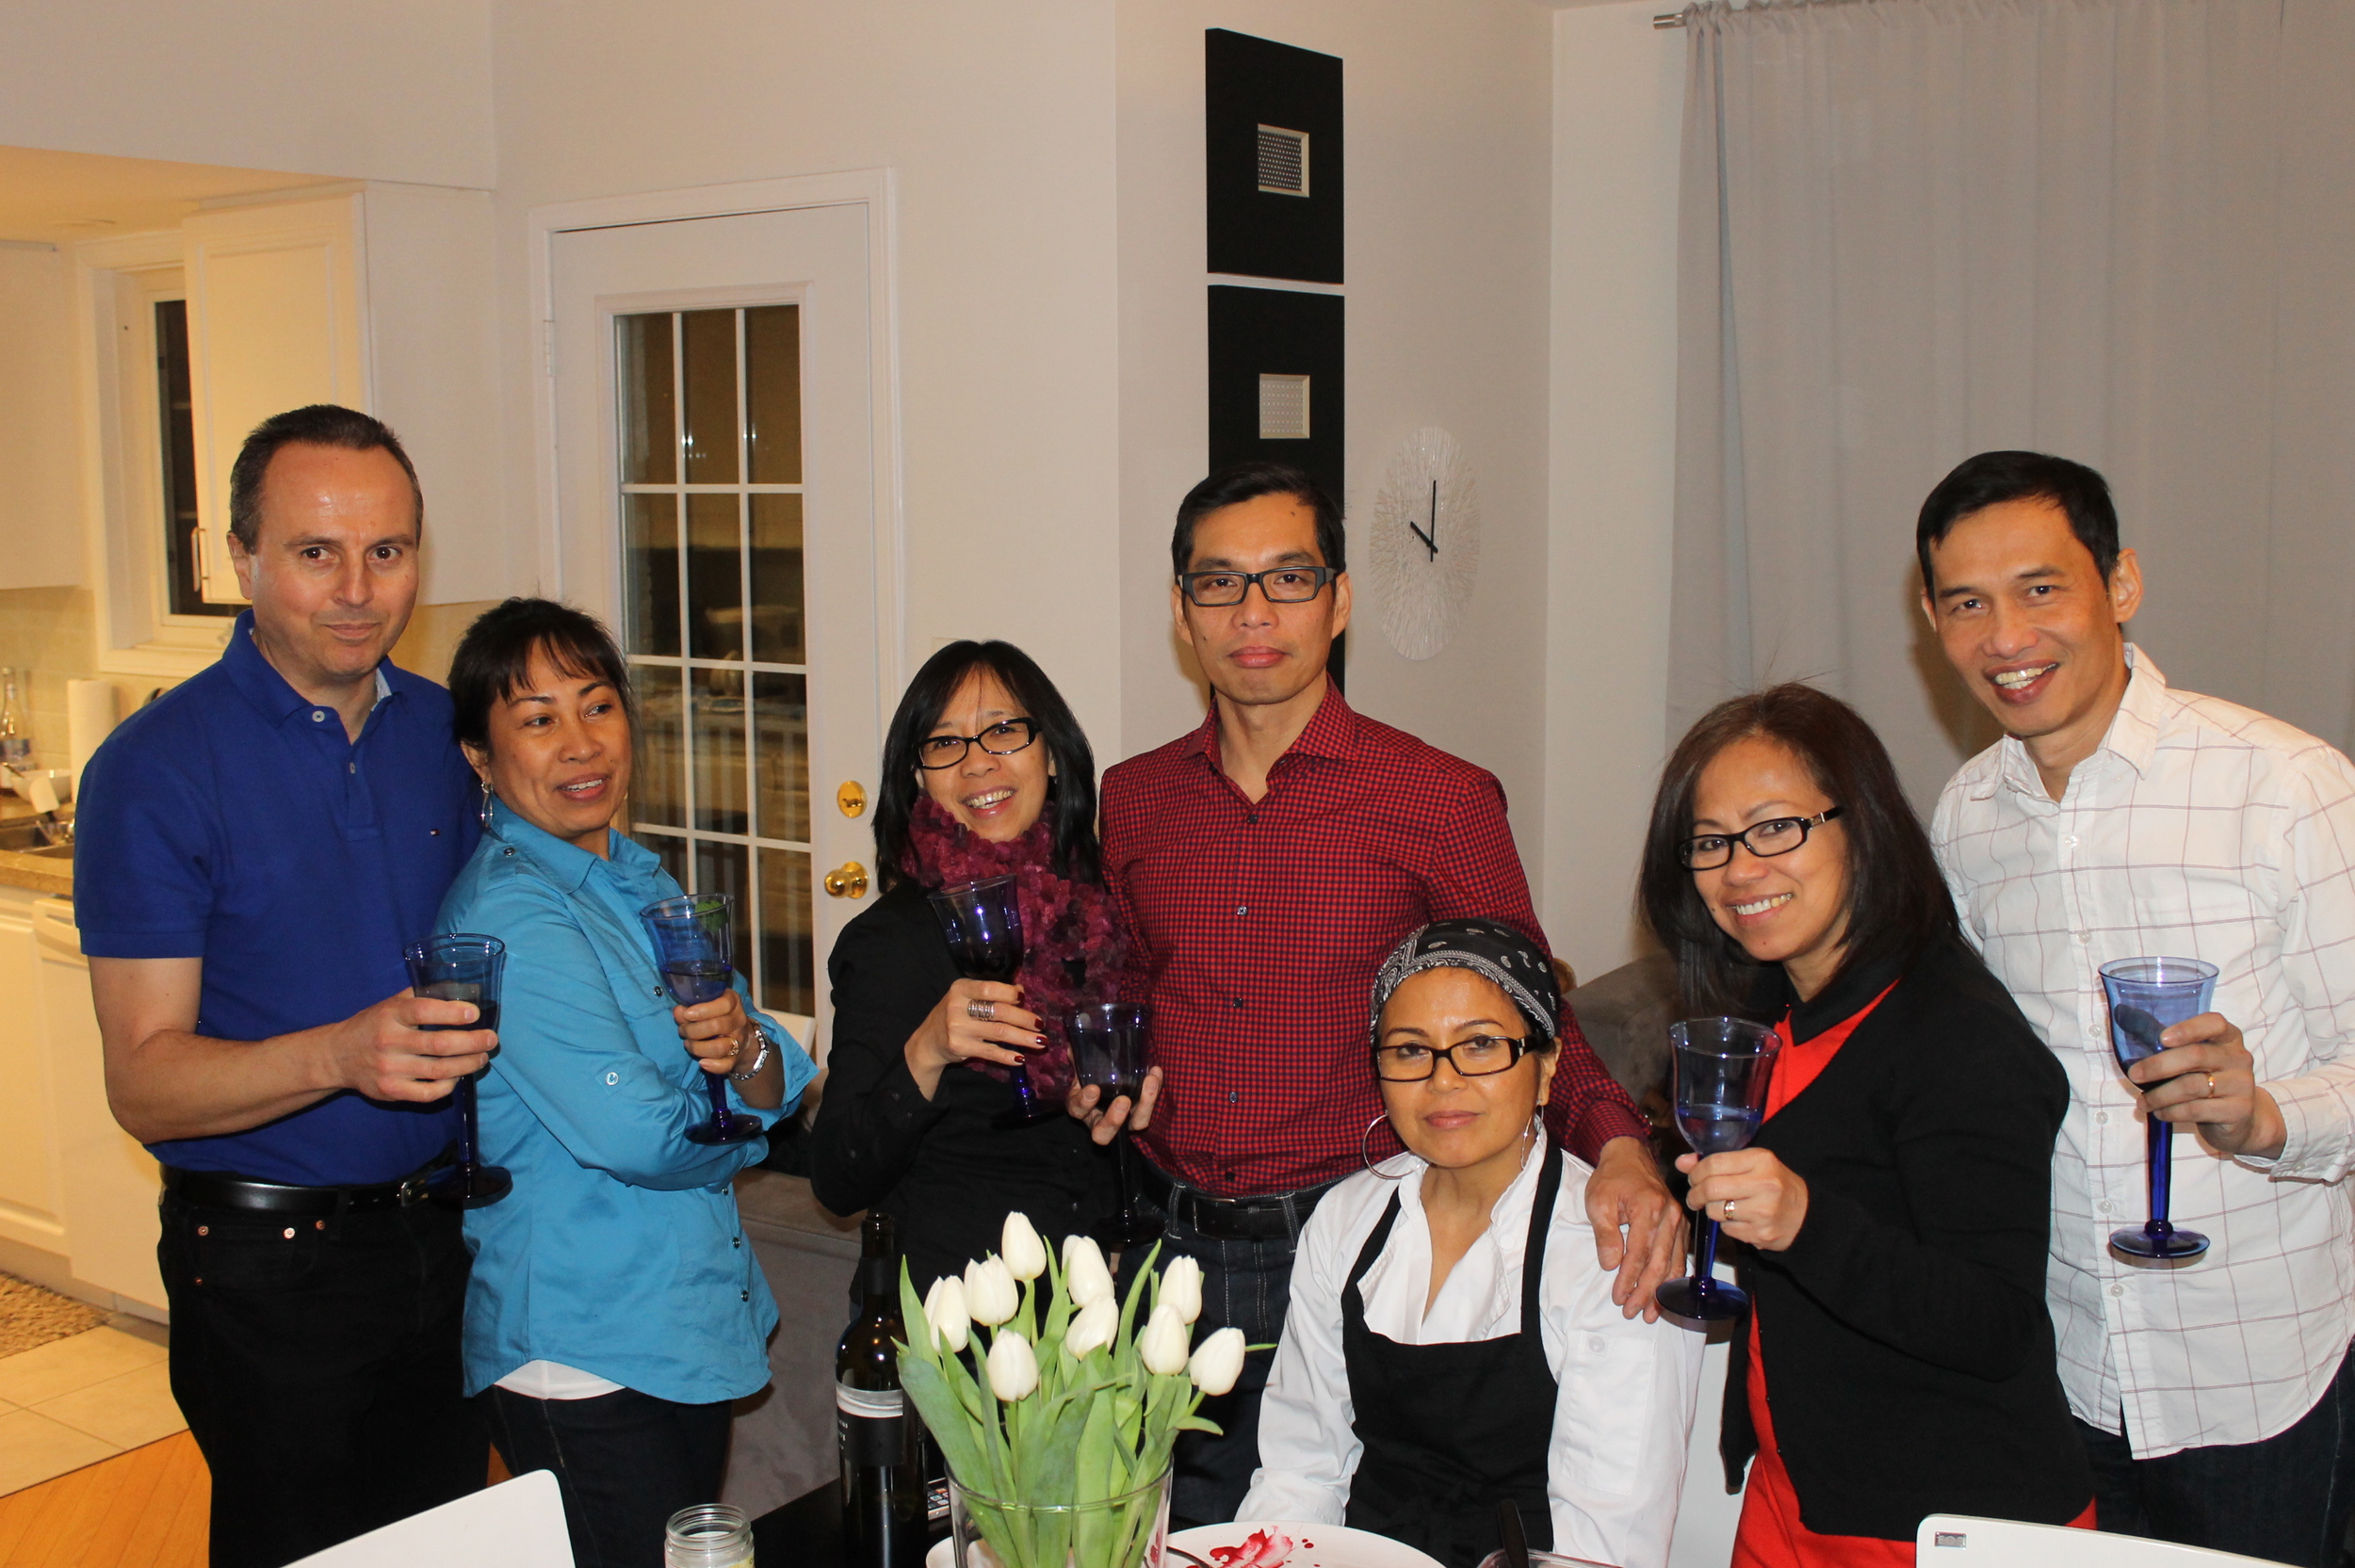
It's been a busy week for me with so much prep just on my own.  I'm thankful that my hubby was in charge in making the house look presentable with his amazing cleaning skills and organization.  He even prepared the plates and utensils, washed the dishes and most of all, helped kept my sanity. He is such a great support and inspiration.  Also, this is not my full-time job...as you may have seen in my bio already, I make mortgages for a living.  During the day, I review mortgage applications, credit bureau reports, appraisals  and manage my relationships with mortgage brokers.  I also help my co-workers achieve the monthly goals for our team.  One day, I hope to be serving food in my own cafe for a living.  

So next month, I'm enrolled online for the Advance or Level 2 program at the Matthew Kenney Culinary.  I'm hoping this will help prepare me for my future.  Wish me luck!  

I hope that whatever dreams you have, you too are pursuing them.  Age is not an issue as I just turned 55 last month!  Go for it, is what I can say.

And by the way, if you live in Toronto, it's super cold out there...keep warm!

Warmly,

Lina

Tri-colour Raw Cheesecake (Happy 17th to our 4th of July Baby)

Dessert, Raw, Raw Dessert, CheesecakeLina Liwag4 Comments

The 4th of July is not only a grand celebration at the South of the border but also at our home.  Our boy was born on the 4th of July seventeen years ago.  My, how time flies!  At first, I was just like any other mum, very excited and at the same time tired or a bit confused on being a new mother.  Sleep was elusive as he was an active baby with no set routine. He loved to interact, played a lot and constantly needed company.   I thought I would never survive the early part of motherhood.  Then, as if I just blinked and he's a grown young man, taller than his 5'9" dad.  And he's 17.  How cool is that!  

These last few days, I've been reflecting on how much God has blessed my husband and I with this wonderful gift!   We had him 4 years after we were married, something we thought would never happen as we had a few hurdles to overcome, mostly me in trying to conceive.  Psalm 127:3  says "Sons are a heritage from the LORD, children a reward from him.  It's a scripture that I hold dear to my heart.

So to  celebrate, I made a 3-layered vanilla and berries raw cheesecake.  The closest we can get to to red, white and blue.  He loves berries and of course the cheesecakes that I've been making lately.  It's a variation of this earlier postmy own birthday day cake in January...except it's a bit bigger.   Berries are currently in season and many of them are locally available.  Just make sure to pick up organic varieties if you can.  Strawberries are on the list here of produce with high pesticides called the Dirty Dozen +.

Vanilla and Berries Tri-colour Raw Cheesecake
Ingredients: (Preferably Organic)

Crust:

1 1/2 c. raw almonds
1 c. coconut flakes
6 Medjool dates, pitted

Place all ingredients in  a food processor and pulse until mixture becomes sticky.  Transfer into an 8" Springform pan and press firmly.  You can also use a 9" and the cake will be just a tad thinner than this one.

Filling:

3 c. raw cashews, soaked for 4-6 hours then rinsed
1 /4 c. coconut butter, softened
1 1/4 c. coconut oil, melted
1  c. coconut nectar or maple syrup
1 1/2 vanilla pods, scraped or 1/2 tsp. ground vanilla 
3/4 c. lemon juice
1  1/2 c. fresh strawberries, chopped
1 c. fresh blueberries, 
1/2 c. frozen blueberries, thawed (it gives it a much deeper purple colour)

Toppings:
3/4 c. blueberries
1 c. strawberries, sliced

Method:

 In a high speed blender, combine the first 6 ingredients and blend until smooth.  Divide the mixture into thirds.  Put back 1/3 into the blender, add the strawberries and blend until incorporated.  Adjust the taste if necessary.  Pour into the crust.  Place the pan in the freezer for 10 mins. to firm up.  Next, pour the other 1/3 (vanilla layer) over the strawberry layer.  Place it back into the freezer for another 10 mins.   Rinse the blender and add the last third with the blueberries and blend until smooth.  Adjust the taste.  Bring out the pan again and pour over. the vanilla layer.  Freeze for 6 hours.

To serve, pop out the cake from the pan while it's still frozen.  This will keep the cake from sticking into the sides of the pan.  Let it soften for 20-30 mins.  Run a knife through hot water then cut the cake.  Top with berries. I love this cake when it's semi-frozen.  It tastes like ice cream!

Suggestions:

The  sweetener can be reduced to 3/4 cup.   I'm serving this to our extended family who would enjoy a much sweeter dessert.  Other kinds berries can also be used like raspberries and blackberries.  For these types, it's a good idea to strain the seeds for a smoother consistency.


IMG_5604.jpg

Did you celebrate the 4th of July?  When I made this cake, I also gathered some wild flowers near our home.  They are so pretty!  Summer is such a fun season.  I'm trying to enjoy every bit of it since the warmer months in Canada are too short.   I hope you are having your own share of Summer fun!

Warmly,

Lina

Raw Mango Cheesecake

Cheesecake, DessertLina Liwag3 Comments

It's Father's Day and it's a time to celebrate!  And what  better way than a cake!  

This time of year reminds me of all the tropical fruits in the Philippines and mango comes in on top of the list.  We have so many in our backyard back home and every summer we have mango overload!   As a little kid, I loved it so much.  In the heat of summer, I would just have it for lunch, not caring too much of cooked food.  Of course at this time, I also remember my dear Papang who planted all those mangoes and fruit trees for us.  He's the best!  I  remember him as a great teacher, community worker, the original Mr. DIY.  He can fix everything even your lack of Math skills.  

IMG_5553.jpg

I've got these perfect Manila mangoes and so I thought, why not a mango cheesecake.  So here it is, my first try and I'm happy it was enjoyed by both of my boys  (I call my hubby as one of the boys too) and as I write this post, my teenager has asked me to make another one.  It's now in the freezer and he's waiting patiently for it to set.  

Raw Mango Cheesecake

Crust:
3/4 cup raw almonds
1 c. coconut flakes
4 Medjool dates
pinch of salt
1 Tbsp. water 

In a food processor, pulse all ingredients until mixture gets sticky.  Transfer and press into a 7" Springform pan.  

Filling
1 c. young coconut meat
1 c. raw cashews, soaked for 4-6 hours
1/4 c. coconut water or nut milk
1/2 tsp. vanilla extract or powder
1/4 c. lemon juice
1/3 c. coconut nectar or maple syrup
1/3 c. coconut oil, melted

On a high speed blender, blend everything except for the coconut oil until smooth.  Add the oil and continue blending until well combined.  Adjust the taste.  Pour filling into the crust.

Mango Swirl
1 c.  ripe mango (Manila or Ataulfo varieties are the best)
1 Tbsp. lime

Blend both ingredients until smooth. Pour the sauce on top of the cake and using a chopstick, create swirls of your own design.  I'm not really a pro on this but I found that any design would look pretty.  Freeze for 4-6 hours or until cake is solid.   Remove  the cake from  the pan while it's still frozen is best (prevents it from sticking into the sides) then let it sit for 30 mins. before serving.  Or if you prefer it frozen like me, you can just run a knife in hot water and cut the cake to serve.  Enjoy!

Suggestions:

1.  If young coconut meat is not available,  use 1 1/2 c. of raw cashews.  
2.  Any fruit of your choice can be used instead of mangoes.

I hope you had a great Father's Day celebration.  It was great to have lunch and hang out with friends today.  And as we thank and celebrate all earthly fathers, let's not forget the greatest Father of all...from whom all blessings flow :)

Blood Orange and Chocolate Layered Raw Cheesecake

Dessert, Raw, Raw Dessert, CheesecakeLina Liwag2 Comments

Happy Easter and Happy Spring!  Although I've been missing in action for 2 months, there's a big reason why...let me tell you.  One of my wishes for a long time was granted.  I was able to go for four weeks to beautiful and sunny Santa Monica, California to train at the prestigious Matthew Kenney Culinary Academy.  It was a blast!  Take a look at this photo taken on my first week at the Academy with Matthew Kenney.  I will be posting some of my other iPhone photos and of course my experiences in the coming posts when I get a chance to get everything all sorted out.  

Everyone has been asking me "what now?"  As some of you may know, I am 54 years old and I work as a Team Leader in Residential Mortgage Underwriting.  I've been in this industry for almost 20 years.  My love for health and wellness came about when I was turning 50 as a result of my own health journey.  It has now become my new passion.  So I've been on a path of learning: graduating as a health coach from IIN in September 2013 and raw chef training has always been in my heart for a while.  I am so blessed to be able to have the chance to do just that.  For now, I will remain in my day job while doing my new passion in between.  As I love to say, "things will happen organically."  They always do.  So now let me share with you our Easter 2014 Dessert!

Making this dessert reminds me of the Santa Monica Farmer's Market.  Every Wednesday, it is bursting with energy, excitement, colours and abundance from the earth.  Citrus was in season when I was there.  Our class made a few trips there for our projects as it was only across the street from MK Academy.  It also reminds me of our Final Presentation. I would have made this as my dessert course...I don't know why I didn't??  Anyway, I love blood orange! They are so colourful and nutritious. Anthocyanin is an antioxidant that provides the blood orange its distinct colour.  

Blood Orange and Chocolate Raw Cheesecake

Crust:
1 cup raw almonds
1 cup Medjool dates, pitted
1 Tbsp. lemon

In a food processor, pulse the almonds until they are coarsely chopped.  Add the dates and lemon and continue to process until they stick together when you pinch it.  If your dates are too dry, add a bit of water, 1 teaspoon at a time making sure it won't be too watery.  Press the mixture into an 8-inch spring form pan.

First Layer (Blood Orange)
1 cup raw cashews, soaked until soft (4-6 hours), drained
3/4 cup blood orange juice
2 Tbsp. lemon juice
1/4 c.  coconut nectar or maple syrup
3 tbsp. orange zest
1/4 c. coconut butter, melted
1/4 c. coconut oil, melted

Combine all ingredients in a high speed blender.  Blend until smooth. Adjust the taste (the crust is sweet so it blends well with the not so sweet 2 layers). Pour over crust.  Place the  pan in the freezer to set for 10 minutes while you get to work on the top layer.

Top Layer (Chocolate and Orange)
1 cup raw cashews, soaked until soft (4-6 hours), drained
1/2 c. orange juice (I used regular orange)
1/4 c. cacao butter, grated or chopped then melted
1/3 c. coconut nectar or maple syrup
1/4 tsp. vanilla powder
a pinch of salt
1/4 c. raw cacao powder

Combine everything except the cacao powder in a high speed blender.  Blend until smooth.  Add the cacao powder in 3 stages at the last part of blending.  Adjust the taste.  Pour over the blood orange layer.  Freeze for 6-7 hours.  Remove from freezer 30 minutes before serving.

Optional Add-On's

Candied Oranges
Slice 1 -2 oranges in rounds.  Coat the slices in 2-3 Tbsp. of maple syrup and dehydrate until they become dry, about 36 hours. Cut out the peels with a pair of kitchen scissors or sharp knife. 

Chocolate Bark
1/4 c. cacao butter, grated or chopped
3 Tbsp. maple syrup
3 Tbsp.  raw cacao powder
pinch of salt
1 Tbsp. chopped pistachios

Combine everything in a bowl  except for the nuts and place it on a double boiler to melt or  over a pot of simmering water. Spread  thinly on a pan lined with parchment paper.  Scatter the pistachios then place is freezer to set for 15 minutes.  When done, break them in different sizes.

Coulis
1/2 c. blood orange
1 small Fuji apple
1 Tbsp. chopped mint leaves
pinch of cardamom
Combine everything in a high speed blender.  Blend until smooth. Adjust the taste and check for consistency.  Add more apples for thicker sauce.

Assemble:  Serve a slice with candied blood orange rounds, chocolate bark and coulis.  Some chopped pistachios are great too.  Decorate the plate as you would want to. Enjoy!


I hope you had an awesome Easter celebration with your family.  I will be sharing some of my own MK-inspired creations in the coming weeks so stay tuned!

Warmly,

Lina 

"Triple-Decker" Raw (Birthday) Cheesecake

Dessert, Cheesecake, Raw Desserts, Raw CheesecakeLina Liwag4 Comments
IMG_5223.jpg

So January flew by fast...although it feels like the latest buzzword (in Toronto), the "polar vortex" is here indefinitely.  The media calls it "the winter visitor that refuses to leave."  But in the midst of these consistent sub-zero temps and record high snow falls, it was a time for celebration.  It was the big month of birthdays in my mini community.   I first wrote about it on this post here last year. 

So for an update, my dad who lives in the Philippines, turned 89 on January 15th.  What's really exciting to share about him is that he has started drinking green juice!  My brother and I bought him this kind of juicer here as a Christmas present.  The first juice recipe that my sister made for him was a mix of carrots, apple and the awesome moringa leaves (malunggay) -  fresh and organic from our backyard  there.  How cool is that!  You can definitely start a healthy practice at any stage in life.  I think having an open mind is the key. 

This year, the number of celebrants on my floor at work has increased to 11.  Half of that is from  my team.  Just imagine how many candles were being blown every time. Crazy! 

IMG_5202.jpg

It's then predictable that it's also a time for making birthday treats, right?  But the real question is: how can I possibly squeeze this in to my ever so tight schedule? I managed...made a huge Cherry Chocolate Cheesecake for the birthday celebrants at work (check it here on my Instagram page) and then there's this special one for my husband who happens to celebrate his birthday back to back with me.   So here goes "Triple-Decker Raw (Birthday) Cheesecake.  Delicious and colourful bites and tastes of sunshine on this gloomy season of the polar vortex! Happy Birthday everyone especially to my soulmate, Angel! 

IMG_5230.jpg

"Triple-Decker" Raw (Birthday) Cheesecake
Ingredients (Preferably Organic)

For The Crust:
3/4 cup raw almonds
1/2 cup dried Turkish figs, chopped
1 Tbsp. water
Method:
Place all ingredients into a food processor and pulse until the mixture becomes sticky and holds together.  Transfer to a 6" x 2 3/4" springform pan and press firmly.  A 7" one can also be used.  The cake will be a bit thiner.

First Layer: Persimmon Cheesecake
1/2 cup raw cashews soaked for 6 hours
1 cup Vanilla or Fuyu persimmon, chopped
2 Tbsp. fresh lemon juice
2 Tbsp. fresh clementine or orange juice
2 Tbsp. coconut  butter, softened
1 Tbsp. coconut oil melted
2 tsp. maple syrup
1/8 tsp. vanilla powder
Method:
Place all ingredients in a high speed blender and blend until the mixture becomes very smooth. Adjust the taste.  Pour into the crust and place it in the freezer while you get to work on the next layers.

Second Layer: Matcha Green Tea and Avocado Cream
1/2 cup young coconut meat
1 medium size avocado
2 tsp. matcha green tea powder
3 Tbsp. coconut water
1  1/2 Tbsp. coconut oil
3 Tbsp. fresh lemon juice
2 Tbsp + 1 tsp. maple syrup (or more depending on your taste)
Method:
Dissolve the green tea with the coconut water and set aside.  Rinse either your food processor or high speed blender and process all the ingredients until smooth and creamy.  Adjust the taste.  Take out the pan from the freezer and pour the avocado cream on top of the persimmon layer. Return the pan into the freezer.  

Top Layer: Blueberry Cheesecake
1/2 cup raw cashews soaked for 6 hours
1 cup  fresh or frozen (then thawed) blueberries (see suggestions)
2 Tbsp. fresh lemon juice
2 Tbsp. fresh clementine or orange juice
2 Tbsp. coconut  butter, softened
1 Tbsp. coconut oil melted
1  1/2 Tbsp. maple syrup 
1/8 tsp. vanilla powder

Method:
Place all ingredients in a high speed blender and blend until the mixture becomes very smooth. Adjust the taste.  Pour on top of the avocado cream layer.  Freeze the cake for 2-3 hours.  To serve, remove from freezer at least 30 minutes (or more) before serving.   Run a knife under hot water and cut into slices.    Enjoy!

Suggestions:
1.  If young coconuts are not available in your area, you can use cashews as a substitute.  I would say use 1/3 cup and soak them.  The coconut water can just be replaced with filtered water.  
2. If you want the colour of the top layer to be more vibrant, use organic frozen blueberries and thaw them first.  A mix of fresh and frozen is also great.  This is my second time to make this cake so I noticed the difference. 
 

IMG_5208.jpg

I usually take the time to meditate on the things that I'm thankful about every time I turn a year older.  Here are the big ones:  the Lord's kindness and blessings, my family, my friends. Canada, my job and my health.  It's been pretty amazing for a 54 year old I must say!  I hope you're enjoying the first part of the year.  Let me know what you think of this Birthday cake!

Warmly,

Lina